How a hands-on multi-tier setup with Nginx, Tomcat, RabbitMQ, Memcached, and MariaDB taught me why DevOps automation matters — one broken connection at a time.
Overview
The vProfile Project is a real-world, multi-tier web application designed to show how individual infrastructure components come together to form a scalable enterprise system. It combines:
- Nginx — the reverse proxy and web entry point
- Tomcat — the Java application server
- RabbitMQ — the messaging backbone
- Memcached — the caching layer for performance
- MariaDB — the persistent data store
In this first part of the series, we set up the entire stack manually on local VMs (compatible with Mac M1/M2). We walk through the setup, encounter real-world issues like "502 Bad Gateway," "No route to host," and "RabbitMQ server is off," and resolve them step by step.
Scenario and Motivation
The primary goal was to set up and test the full vProfile architecture locally — to feel the friction of real infrastructure work before introducing automation. By setting up everything manually, we intentionally exposed the pain points:
- Lengthy configuration steps
- Service dependency issues
- Firewall conflicts
- Misaligned IPs and ports
- Unrepeatable builds
Architecture Overview
Users access the Nginx frontend → requests go to the Tomcat app → the app interacts with Memcached for caching, RabbitMQ for messaging, and MariaDB for persistence.
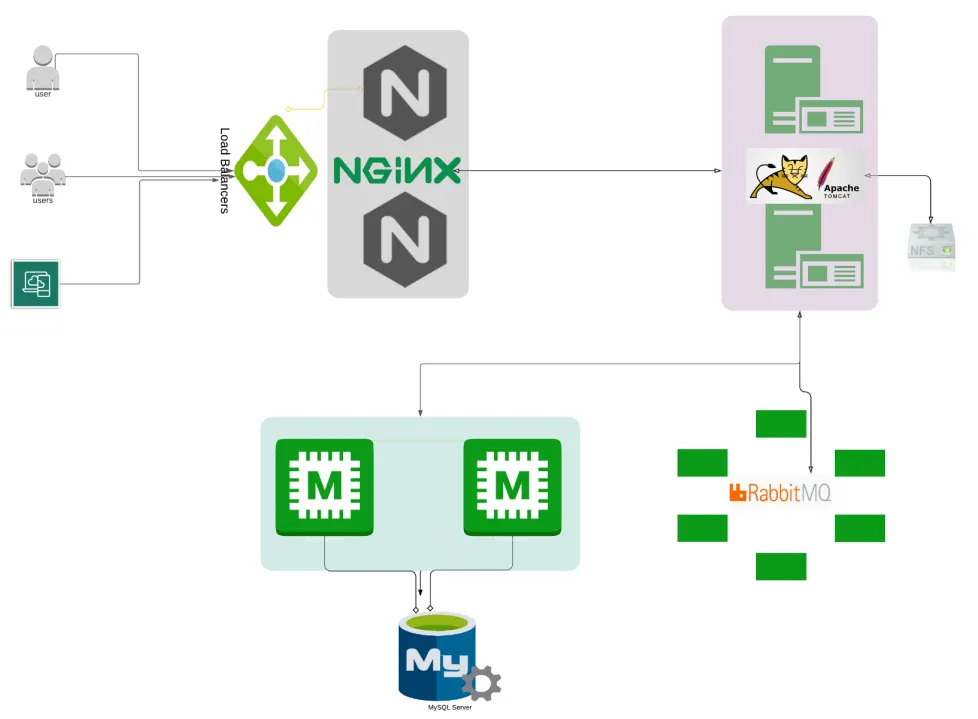
Multi-tier vProfile architecture — Nginx → Tomcat → RabbitMQ, Memcached, MariaDB
Provisioning order:
- MySQL / MariaDB (Database SVC)
- Memcache (DB Caching SVC)
- RabbitMQ (Broker/Queue SVC)
- Tomcat (Application SVC)
- Nginx (Web SVC)
Environment Setup
Five VMs were created on a Mac M1/M2 system using Vagrant and VMware. Each VM hosts one component of the stack.
| Hostname | Role | IP Address |
|---|---|---|
| web01 | Nginx | 192.168.56.21 |
| app01 | Tomcat | 192.168.56.22 |
| rmq01 | RabbitMQ | 192.168.56.23 |
| mc01 | Memcached | 192.168.56.24 |
| db01 | MariaDB | 192.168.56.25 |
Vagrantfile:
Vagrant.configure("2") do |config|
  config.hostmanager.enabled = true
  config.hostmanager.manage_host = true

  config.vm.define "db01" do |db01|
    db01.vm.box = "bandit145/centos_stream9_arm"
    db01.vm.hostname = "db01"
    db01.vm.network "private_network", ip: "192.168.56.25"
    db01.vm.provider "vmware_desktop" do |vmware|
      vmware.gui = true
      vmware.allowlist_verified = true
    end
  end

  config.vm.define "mc01" do |mc01|
    mc01.vm.box = "bandit145/centos_stream9_arm"
    mc01.vm.hostname = "mc01"
    mc01.vm.network "private_network", ip: "192.168.56.24"
    mc01.vm.provider "vmware_desktop" do |vmware|
      vmware.gui = true
      vmware.allowlist_verified = true
    end
  end

  config.vm.define "rmq01" do |rmq01|
    rmq01.vm.box = "bandit145/centos_stream9_arm"
    rmq01.vm.hostname = "rmq01"
    rmq01.vm.network "private_network", ip: "192.168.56.23"
    rmq01.vm.provider "vmware_desktop" do |vmware|
      vmware.gui = true
      vmware.allowlist_verified = true
    end
  end

  config.vm.define "app01" do |app01|
    app01.vm.box = "bandit145/centos_stream9_arm"
    app01.vm.hostname = "app01"
    app01.vm.network "private_network", ip: "192.168.56.22"
    app01.vm.provider "vmware_desktop" do |vb|
      vb.memory = "2024"
      vb.gui = true
      vb.allowlist_verified = true
    end
  end

  config.vm.define "web01" do |web01|
    web01.vm.box = "spox/ubuntu-arm"
    web01.vm.hostname = "web01"
    web01.vm.network "private_network", ip: "192.168.56.21"
    web01.vm.provider "vmware_desktop" do |vmware|
      vmware.gui = true
      vmware.allowlist_verified = true
    end
  end
end
Installing and Configuring Each Layer
Database Layer — db01 (MariaDB)
sudo dnf install git mariadb-server -y
sudo systemctl enable mariadb
sudo systemctl start mariadb
sudo mysql_secure_installation
CREATE DATABASE accounts;
CREATE USER 'admin'@'%' IDENTIFIED BY 'admin123';
GRANT ALL PRIVILEGES ON accounts.* TO 'admin'@'%';
FLUSH PRIVILEGES;Message Queue — rmq01 (RabbitMQ)
sudo dnf install epel-release -y
sudo dnf install rabbitmq-server -y
sudo systemctl enable rabbitmq-server
sudo systemctl start rabbitmq-server
sudo rabbitmqctl add_user test test
sudo rabbitmqctl set_user_tags test administrator
sudo rabbitmqctl set_permissions -p / test ".*" ".*" ".*"
Caching Layer — mc01 (Memcached)
sudo dnf install memcached -y
sudo systemctl enable memcached
sudo systemctl start memcached
Application Layer — app01 (Tomcat + Java)
sudo dnf install java-17-openjdk maven -y
cd /tmp
git clone https://github.com/devopshydclub/vprofile-project.git
cd vprofile-project
mvn install
Web Layer — web01 (Nginx)
sudo dnf install nginx -y
sudo systemctl enable nginx
sudo systemctl start nginx
Issue 1: "502 Bad Gateway" — Tomcat Not Reachable by Nginx
During the first run, Nginx on web01 was configured as a reverse proxy, but when it tried to forward traffic to app01 (Tomcat on port 8080), requests failed with a 502 Bad Gateway error.
Root cause: Tomcat hadn't fully started, and the firewall on app01 was blocking port 8080.
How I verified:
sudo ss -tulnp | grep 8080   # confirmed Tomcat wasn't listening
curl app01:8080              # failed connection from web01
Fix:
sudo systemctl restart tomcat
sudo firewall-cmd --add-port=8080/tcp --permanent
sudo firewall-cmd --reload
curl app01:8080 # successful HTML response from TomcatIssue 2: "User Not Found" — Hidden Database Connectivity Problem
After resolving the Nginx/Tomcat issue, logging in returned "User Not Found." The application couldn't communicate with the database server even though both were running.
Root cause: MariaDB was bound only to localhost (127.0.0.1), preventing remote connections. Additionally, the firewall on db01 was blocking port 3306.
How I verified:
busybox nc -zv db01 3306
# db01 (192.168.56.25:3306): No route to host

sudo cat /etc/my.cnf.d/mariadb-server.cnf | grep bind-address
# bind-address=0.0.0.0  ← was commented out
Fix:
# Edit MariaDB config
sudo vim /etc/my.cnf.d/mariadb-server.cnf
# Add: bind-address=0.0.0.0

sudo systemctl restart mariadb
sudo firewall-cmd --add-port=3306/tcp --permanent
sudo firewall-cmd --reload

busybox nc -zv db01 3306
# db01 (192.168.56.25:3306) openIssue 3: "RabbitMQ Server Is Off"
After fixing the database, a new error appeared: "RabbitMQ server is off. Please start the RabbitMQ server and try again." The service was running — but unreachable due to a firewall rule.
How I verified:
sudo ss -tulnp | grep 5672
# tcp LISTEN 0 128 *:5672  ← RabbitMQ was listening

busybox nc -zv rmq01 5672
# rmq01 (192.168.56.23:5672): No route to host
Fix:
sudo firewall-cmd --add-port=5672/tcp --permanent
sudo firewall-cmd --reload

busybox nc -zv rmq01 5672
# rmq01 (192.168.56.23:5672) openIssue 4: Memcached — Empty Response and Slow Loading
The application loaded and users appeared, but data was loading slowly and the cache status showed empty brackets []. The app was hitting the database on every request instead of using Memcached.
Root cause: Memcached started before its network socket was fully ready. SELinux also restricted remote connections silently.
How I verified:
sudo ss -tulnp | grep 11211
# tcp LISTEN 0 1024 0.0.0.0:11211  ← Memcached was running

busybox nc -zv mc01 11211
# mc01 (192.168.56.24:11211): No route to host
Fix:
sudo systemctl restart network
sudo systemctl restart memcached
sudo setsebool -P memcached_connect_any 1

busybox nc -zv mc01 11211
# mc01 (192.168.56.24:11211) openConclusion — From Broken Links to a Fully Connected Stack
Each fix told a different story about how fragile, yet fascinating, multi-tier systems can be when managed manually. From Nginx failing to reach Tomcat, to the "User Not Found" database bind issue, to the RabbitMQ firewall block, to the silent Memcached failure — every issue forced a deeper look at how these layers depend on each other.
Once every component was aligned, the result was immediate: no lag, no errors, and the cache confirming:
"Data is From DB and Data Inserted in Cache!!" → "Data is From Cache."
Manually setting up vProfile showed the importance of sequence, connectivity, and observability in DevOps. Every slow load and every "No route to host" reinforced why automation tools like Vagrant, Ansible, and Terraform are so powerful — not because they eliminate errors, but because they make consistency repeatable.