Imagine a weather tracking app that people rely on daily. What happens if the AWS region hosting it goes down? You don't want users staring at error pages. That's the challenge I wanted to solve — a multi-cloud weather tracker that stays online even if one provider fails.
Why I Built This
So I built an app hosted on AWS S3 + CloudFront and backed up on Azure Blob Storage. Using Route 53 DNS Failover, the app can automatically redirect users to Azure if AWS goes down. All of this is automated with Terraform, so redeploying is as simple as running a command.
Key Goals
- Deploy app front-end to AWS S3 and Azure Blob
- Use Route 53 DNS Failover for disaster recovery
- Manage everything with Terraform (multi-cloud IaC)
- Keep costs near zero (just the domain fee)
Services in Play
- AWS S3 + CloudFront — fast, global hosting
- Azure Blob Storage — backup hosting for DR
- Route 53 — DNS health checks + failover
- Terraform — infrastructure automation
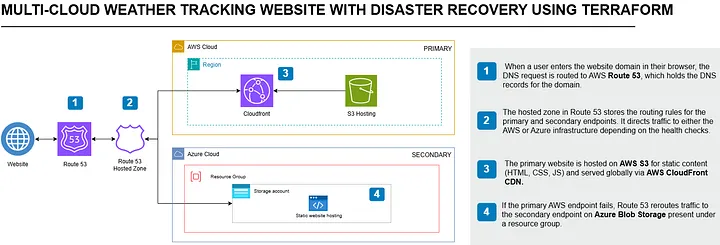
Architecture — Route 53 DNS failover between AWS CloudFront/S3 (primary) and Azure Blob Storage (secondary)
Phase 1: Prerequisites & Setup
1. Install Terraform
Visit the Terraform Downloads page and install for your OS. On macOS:
brew install terraform
terraform --version
2. Configure AWS & Azure CLI
Install and configure the AWS CLI:
aws configure
# Provide Access Key ID, Secret Access Key, and default region
Install and log in with Azure CLI:
az login
az account show  # Note your Subscription ID and Tenant ID
Create a Service Principal for Terraform:
az ad sp create-for-rbac --role="Contributor" --scopes="/subscriptions/<subscription-id>"
# Note the appId (Client ID), password (Client Secret), and tenant (Tenant ID)
3. Create the Terraform Project Structure
mkdir multi-cloud-weather-tracker
cd multi-cloud-weather-tracker
Create the following files: main.tf, variables.tf, aws_credentials.tfvars, azure_credentials.tfvars.
variables.tf:
variable "aws_access_key" {}
variable "aws_secret_key" {}
variable "azure_client_id" {}
variable "azure_client_secret" {}
variable "azure_subscription_id" {}
variable "azure_tenant_id" {}
main.tf providers:
provider "aws" {
  access_key = var.aws_access_key
  secret_key = var.aws_secret_key
  region     = "us-east-1"
}

provider "azurerm" {
  client_id       = var.azure_client_id
  client_secret   = var.azure_client_secret
  subscription_id = var.azure_subscription_id
  tenant_id       = var.azure_tenant_id
}*.tfvars to .gitignore to prevent credentials from being pushed to version control.
4. Initialize Terraform
terraform init
terraform validate
Phase 2: AWS S3 Static Hosting
The website code is available at: github.com/Eweka01/Cloud-Projects. Download and rename the folder to website/ in your project root.
S3 bucket + static hosting (main.tf):
resource "aws_s3_bucket" "weather_app" {
  bucket = "weather-tracker-app-bucket-345382"

  website {
    index_document = "index.html"
    error_document = "error.html"
  }

  lifecycle {
    prevent_destroy = true
  }
}

resource "aws_s3_bucket_public_access_block" "public_access" {
  bucket                  = aws_s3_bucket.weather_app.id
  block_public_acls       = false
  block_public_policy     = false
  ignore_public_acls      = false
  restrict_public_buckets = false
}

resource "aws_s3_object" "website_index" {
  bucket       = aws_s3_bucket.weather_app.id
  key          = "index.html"
  source       = "website/index.html"
  content_type = "text/html"
}

resource "aws_s3_object" "website_assets" {
  for_each = fileset("website/assets", "*")
  bucket   = aws_s3_bucket.weather_app.id
  key      = "assets/${each.value}"
  source   = "website/assets/${each.value}"
}

resource "aws_s3_bucket_policy" "bucket_policy" {
  bucket = aws_s3_bucket.weather_app.id
  policy = jsonencode({
    Version = "2012-10-17",
    Statement = [{
      Sid       = "PublicReadGetObject",
      Effect    = "Allow",
      Principal = "*",
      Action    = "s3:GetObject",
      Resource  = "arn:aws:s3:::${aws_s3_bucket.weather_app.id}/*"
    }]
  })
}
terraform apply -var-file="aws_credentials.tfvars" -var-file="azure_credentials.tfvars"Phase 3: Azure Blob Storage (Standby)
resource "azurerm_resource_group" "rg" {
  name     = "rg-static-website"
  location = "East US"
}

resource "azurerm_storage_account" "storage" {
  name                     = "mystorageaccount345382"
  resource_group_name      = azurerm_resource_group.rg.name
  location                 = azurerm_resource_group.rg.location
  account_tier             = "Standard"
  account_replication_type = "LRS"
  account_kind             = "StorageV2"

  static_website {
    index_document = "index.html"
  }
}

resource "azurerm_storage_blob" "index_html" {
  name                   = "index.html"
  storage_account_name   = azurerm_storage_account.storage.name
  storage_container_name = "$web"
  type                   = "Block"
  content_type           = "text/html"
  source                 = "website/index.html"
}

resource "azurerm_storage_blob" "assets" {
  for_each = fileset("website/assets", "**/*")

  name                   = "assets/${each.value}"
  storage_account_name   = azurerm_storage_account.storage.name
  storage_container_name = "$web"
  type                   = "Block"
  content_type           = "application/octet-stream"
  source                 = "website/assets/${each.value}"
}
Phase 4: Disaster Recovery with Route 53 DNS Failover
1. Create a Hosted Zone
resource "aws_route53_zone" "main" {
  name = "yourdomain.com"
}
2. Request an SSL Certificate (ACM)
Go to AWS Certificate Manager → Request a public certificate for yourdomain.com and www.yourdomain.com. Use DNS validation. Once issued, attach to your CloudFront distribution.
3. Define Health Checks
resource "aws_route53_health_check" "aws_health_check" {
  type              = "HTTPS"
  fqdn              = "your-aws-cloudfront.cloudfront.net"
  port              = 443
  request_interval  = 30
  failure_threshold = 3
}

resource "aws_route53_health_check" "azure_health_check" {
  type              = "HTTPS"
  fqdn              = "your-azure-site.web.core.windows.net"
  port              = 443
  request_interval  = 30
  failure_threshold = 3
}
4. Setup Failover Records
resource "aws_route53_record" "primary" {
  zone_id = aws_route53_zone.main.zone_id
  name    = "yourdomain.com"
  type    = "A"

  alias {
    name                   = "your-aws-cloudfront.cloudfront.net"
    zone_id                = "Z2FDTNDATAQYW2"
    evaluate_target_health = true
  }

  failover_routing_policy { type = "PRIMARY" }
  set_identifier  = "primary"
  health_check_id = aws_route53_health_check.aws_health_check.id
}

resource "aws_route53_record" "secondary" {
  zone_id = aws_route53_zone.main.zone_id
  name    = "www.yourdomain.com"
  type    = "CNAME"
  records = ["your-azure-site.web.core.windows.net"]
  ttl     = 300

  failover_routing_policy { type = "SECONDARY" }
  set_identifier  = "secondary"
  health_check_id = aws_route53_health_check.azure_health_check.id
}
5. Update Namecheap Nameservers
Log in to Namecheap → Domain List → Manage → Nameservers → Custom DNS. Enter the 4 Route 53 nameservers from your hosted zone and save. DNS propagation can take up to 30 minutes.
Testing Failover
- Restrict S3 bucket public access (or disable CloudFront)
- Visit your domain — it should redirect to Azure automatically
- You'll see a "Not secure" warning on Azure — this is expected
- The site remains functional despite the warning
Lessons Learned
terraform apply provisions resources across both AWS and Azure simultaneously — no manual console work required.
- Route 53 health checks are the DR engine. Set failure threshold to 3 with a 30s interval for reliable but not overly sensitive failover.
- SGs and bucket policies first. Most access issues stem from public access blocks or missing bucket policies.
- ACM + DNS validation is non-negotiable. Always attach a certificate to CloudFront before pointing your domain at it.
- Keep costs near zero. S3 static hosting + CloudFront free tier + Azure free storage = essentially just the domain fee.